
D2ucfwpxlh3zh3.cloudfront.net Is Not Just An Annoying Trifle
Believe or not, there is nothing more important than timely removal of D2ucfwpxlh3zh3.cloudfront.net, a harmful URL which triggers endless pop-up alert to block you from smooth web browsing. You may think it is just an annoying incident. However, you could be taken aback once knowing what it does to your computer system behind your back.
D2ucfwpxlh3zh3.cloudfront.net Makes A Mess of Web Browsing
Working on a computer affected by D2ucfwpxlh3zh3.cloudfront.net is anything but easy, of course. It has somehow deeply influenced normal functions of web browsers of commonly-used brands, making every step towards targeted site full of obstacles. These obstacles may be varying in their forms: pop-up alerts, page redirections to unfamiliar ones, clumsy page downloading, so on and so forth.
D2ucfwpxlh3zh3.cloudfront.net Drives You To Unknown Risks
It goes without saying that there would be low mood and high inefficiency while staying with d2ucfwpxlh3zh3.cloudfront.net. On top of that, other serious issues are ready to drag you into sad plight. Damage is born at the moment when d2ucfwpxlh3zh3.cloudfront.net takes root on your computer system. And the only way to eliminate any more risks would be uprooting it as soon as possible.
There is some confirmed misdeeds of d2ucfwpxlh3zh3.cloudfront.net, among which intakes of unwanted programs and facilitations to hackers’ invasion shall be the most cursed. This not only put system running in critical condition, but also imposes crucial private data to cyber criminals. Removal of this URL, first and foremost, cannot be put off any longer.
Quick Steps to Remove d2ucfwpxlh3zh3.cloudfront.net
Windows Users:
Plan A1: d2ucfwpxlh3zh3.cloudfront.net manual removal Guide ( Expertise Required)
Plan B1: d2ucfwpxlh3zh3.cloudfront.net trusted removal tool - SpyHunter ( Guaranteed )
Mac Users:
Plan A2: d2ucfwpxlh3zh3.cloudfront.net manual removal Guide ( Expertise Required)
Plan B2: d2ucfwpxlh3zh3.cloudfront.net professional remover- MacKeeper ( Guaranteed )
|
Plan A1: d2ucfwpxlh3zh3.cloudfront.net manual removal Guide ( Expertise Required)
A: go to Task Manager and end d2ucfwpxlh3zh3.cloudfront.net processes and the suspicious processes
→ click Ctrl+Shift+Esc to open Task Manager
→ choose Processes→ choosed2ucfwpxlh3zh3.cloudfront.net processes and the suspicious processes and click End Process

B: Uninstall d2ucfwpxlh3zh3.cloudfront.net and the suspicious programs from Control Panel
→ click Start→ click Control Panel
→ choose Programs→ choose Uninstall Program
→ choose d2ucfwpxlh3zh3.cloudfront.net and the suspicious programs to uninstall

Windows 10
1. Open Settings, and click/tap on the System icon.
2. In System settings, click/tap on App & features on the left side.
3. On the right side, search for d2ucfwpxlh3zh3.cloudfront.net and doubtful apps that you want to uninstall, and click/tap on the Uninstall button.

4. Click/tap on Uninstall to confirm.
C: remove the harmful extensions and reset your browsers.
Reset Edge Homepage:
Click More (…) on the address bar, then click Settings;
Under Open with, select A specific page or pages. Then you can select a recommended website from drop-down list, or type in your favorite website with Custom option in the list.

Reset Edge Default Search Engine:
Click More (…) on the address bar, then click Settings >> Click View advanced settings;

Click <Add new> under “Search in the address bar with”, type in your favorite search engine;
Choose the search engine you prefer and click Add as default;

1. click the top right corner Three Wrench Bar→ click More tools→Extensions

2. choose relevant extensions and disable it.

IE
1. click Tools→ Manage Add-ons

2. click Toolbars and Extensions→ search for the d2ucfwpxlh3zh3.cloudfront.net extensions and the unwanted ones → click Disable

3. click Tools→ Internet options→ General→ set www.google.com as your home page.

Mozilla Firefox
1. click the top right corner Three Wrench Bar→Add-ons
search for d2ucfwpxlh3zh3.cloudfront.net extension and the suspicious ones and remove

3. click the top right corner Three Wrench Bar → Options→ General
→ input www.google.com or other homepage URL you want into the Home Page bar or you can click Restore to Default to reset your hompeage

D. remove registries generated by d2ucfwpxlh3zh3.cloudfront.net and the malicious ones
→ press Windows+R to go to Run window → input “regedit”

→ look for the following registries to remove
[HKEY_LOCAL_MACHINE\SOFTWARE\Microsoft\MATS\WindowsInstaller\{EAF386F0-7205-40F2-8DA6-1BABEEFCBE89}]"ProductName"="d2ucfwpxlh3zh3.cloudfront.net"
[HKEY_LOCAL_MACHINE\SOFTWARE\Wow6432Node\Microsoft\Tracing\Muvic_RASAPI32]
[HKEY_LOCAL_MACHINE\SOFTWARE\Wow6432Node\Microsoft\Tracing\Muvic_RASMANCS]
[HKEY_LOCAL_MACHINE\SOFTWARE\Wow6432Node\Microsoft\Windows\CurrentVersion\Uninstall\{EAF386F0-7205-40F2-8DA6-1BABEEFCBE89}]
"DisplayName"="d2ucfwpxlh3zh3.cloudfront.net"
[HKEY_USERS\S-1-5-21-3825580999-3780825030-779906692-1001\Software\Microsoft\Windows\CurrentVersion\Uninstall\{50f25211-852e-4d10-b6f5-50b1338a9271}]
"DisplayName"="d2ucfwpxlh3zh3.cloudfront.net"
Plan B1: d2ucfwpxlh3zh3.cloudfront.net trusted removal tool - SpyHunter ( Guaranteed )
Help I’ve already got lots of help from SpyHunter
Help 1: remove d2ucfwpxlh3zh3.cloudfront.net and block infections
Help 2: provide real-time protections and optimize your computer personally
Help 3: protect your confidential information from being stolen
Help 4: give warnings when you attempt to visit dangerous websites
How to use SpyHunter to remove d2ucfwpxlh3zh3.cloudfront.net?
Step 1: click the icon below to download and install SpyHunter

Step 2: After the downloading, follow the instructions it prompts to finish SpyHunter Installation.

Step 3: click Start New Scan to locate d2ucfwpxlh3zh3.cloudfront.net

Step 4: click “Fix Threats” to remove d2ucfwpxlh3zh3.cloudfront.net completely

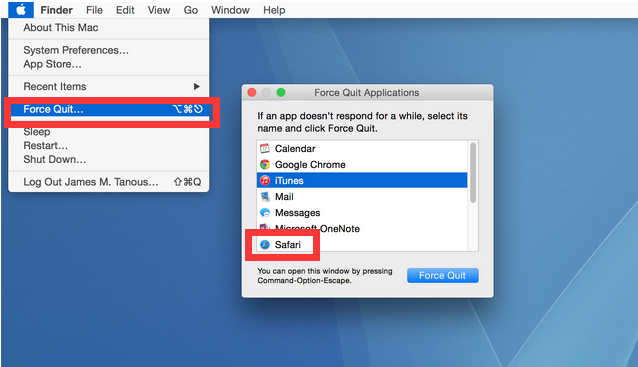
1. Force Quit Safari
Way 1
First, by clicking the Apple logo in the Menu Bar and selecting Force Quit. Alternatively, you can bring up this same window by using the keyboard shortcut Command-Option-Escape. Just highlight Safari and click the Force Quit button to quit it.
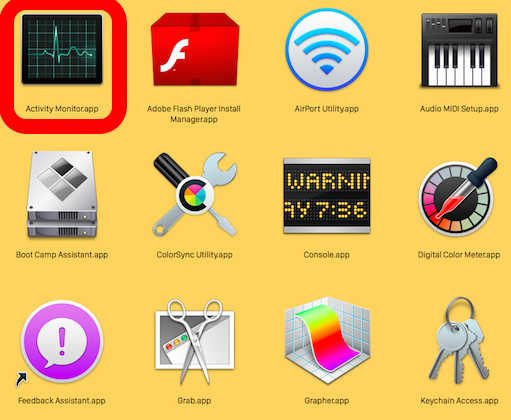
Way 2 allows you to force quit any froze app
Open Finder, go to Applications folder, then Utilities folder, open Activity Monitor by clicking the shortcut.
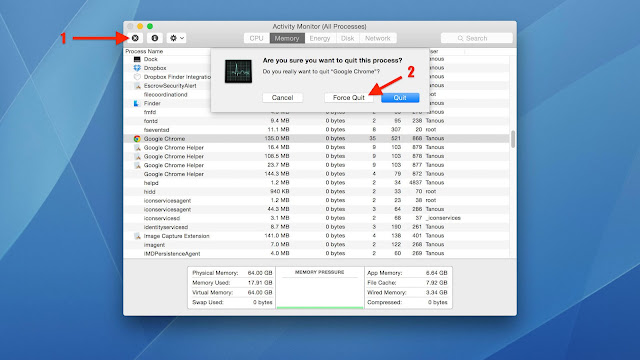
2. Find Safari in the list of running processes. Double click Safari and a window will open that will allow you to kill the Safari process.
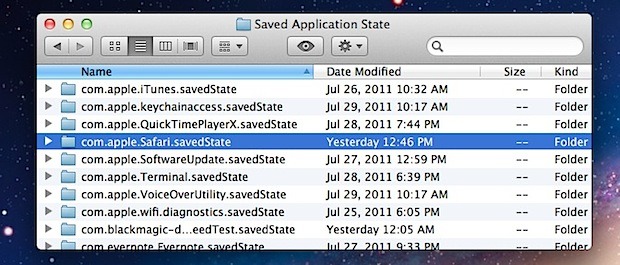
3. Go into the Library folder to the Saved Application State folder. Find the folder named com.apple.Safari.savedState and delete the contents. Restart Safari.
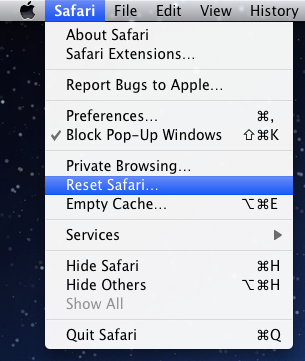
Go to Safari preferences to the Privacy tab. Click on the Remove All Website Data button to remove cookies etc. Then go to Safari / Reset Safari and reset.
Note
Please backup the data you stored on your Safari, like bookmark, usernames and passwords since resetting Safari will clear them all. If you don't want to backup the data by yourself and want d2ucfwpxlh3zh3.cloudfront.net easily, you can ask effective help from MacKeeper.
Plan B2: d2ucfwpxlh3zh3.cloudfront.net professional remover- MacKeeper ( Guaranteed )
No Regret to Choose MacKeeper
What benefits your most is that MacKeeper protects your Mac from phishing scams just like d2ucfwpxlh3zh3.cloudfront.net, malware, spyware, browser hijacker adware, viruses and identity theft while you’re using the Internet. What's more, it makes your personal information invisible to other users and even make it disappear completely so that it can never be recovered.
This is why I strongly recommend MacKeeper to you, to get rid of d2ucfwpxlh3zh3.cloudfront.net without wasting a lot of time and energy and enjoy your online time.
1. Enjoy downloading the professional d2ucfwpxlh3zh3.cloudfront.net removal tool to get rid of d2ucfwpxlh3zh3.cloudfront.net

How MacKeeper serves you Mac users:
Quickly remove junk files including unwanted d2ucfwpxlh3zh3.cloudfront.net files (such as temporary caches, logs, unused language packages and legacy application parts) that take up hard drive space and slow down your Mac.
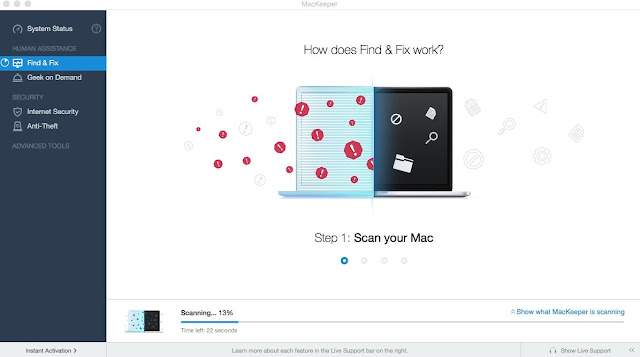
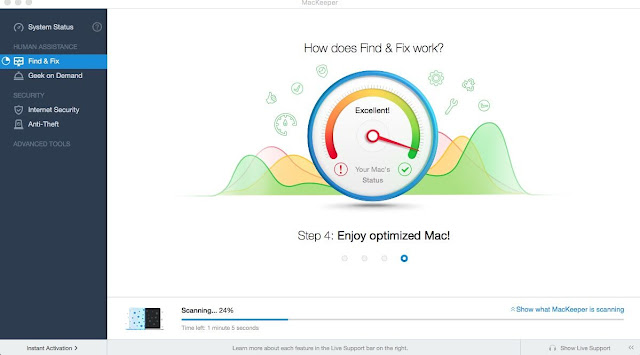
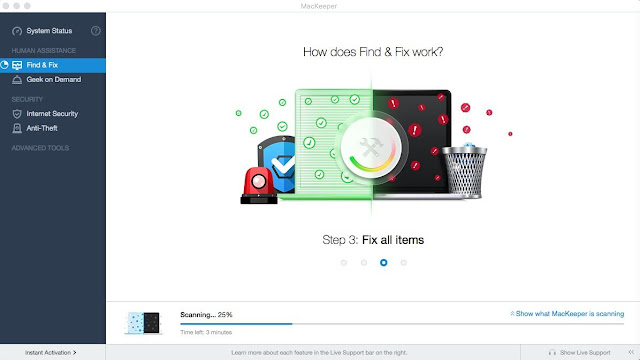
Find and Fix
Get a direct line between your Mac and your personal Apple Certified Support Professional, who can scan your Mac for any risky items like d2ucfwpxlh3zh3.cloudfront.net and fix them remotely. Having a real human expert at your disposal means that even sophisticated problems, which normal scanning software might miss or ignore, can be quickly and easily solved.
Geek on Demand
Geek on Demand is the ultimate tool when you have a problem or question related to your Mac's health and need an expert's opinion or technical assistance. All demands are looked at individually by Apple Certified Support Professionals.

Tips out of Sympathy for d2ucfwpxlh3zh3.cloudfront.net victims
Manual removal solution is efficient to remove d2ucfwpxlh3zh3.cloudfront.net but it requires more expertise than you expect. If you can’t follow it correctly and precisely, it may lead to computer crash. SpyHunter/MacKeeper to a perfect choice for you to get d2ucfwpxlh3zh3.cloudfront.net out of your computer safely and easily because I know that most of the victims are not computer savvies. Do you want to download and install SpyHunter or MacKeeper to help you? Because they did help lots of victims remove d2ucfwpxlh3zh3.cloudfront.net completely out of their computers.
No comments:
Post a Comment